

bariatric recipes
Julia's cooking...
ok..so I'm not Julia Child, but I can cook...and even better...it's bariatric friendly!
Who says you can't still enjoy great food after weight loss surgery? Yes, we can...
Weight loss surgery has given me the opportunity to return to health and wellness and still enjoy the taste and pleasure of food.
Recipes are not entered by "phases". For more information on food phases. check the "Post-op and Pre-op Food Phase" sections under basic information.
So, enjoy! Yes you can, you have many more meals to go.
dreaming green, avocado, egg and toast
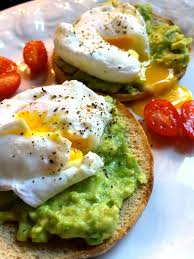 Maybe green eggs and ham are Dr. Seuss' favorite, but if green eggs don't seem to get you going in the morning..you can get your green on by skipping the green eggs and try an egg on some smooth and creamy avocado and toast.
Although breakfast is my favorite meal of the day, it always seems to be the meal that leaves me a little short on choices. I really never thought avocado with eggs sounded like a big deal, but it's one of my sister's favorites. So she inspired me to give it a try, and now, this little taste of green has me dreaming about breakfast.
So far, I've tried this little pillow of "dreamy goodness" on egg and toast as well as half of an English muffin. I've tried it with boiled eggs and fried eggs. I can't wait to try it on 1/4 of an everything bagel or with a poached egg, or even a scrambled egg. And what about with a little bacon, Canadian bacon or even with a few crumbles of turkey sausage or even a little cheese. Or maybe you could skip the toast, and try it as a salsa, diced with tomatoes over an egg. Who would have thought that this little bit of rich, and buttery tropical pear-shaped fruit would have me falling in love with breakfast all over again.
Avocado has replaced the need for butter or mayonnaise on my toast. It's A plant-based, healthy and satisfying fat that's good for you. Too much fat you say, think again! *One ounce is only 4 grams of fat, that's 1 Weight Watcher point. Less points than a tablespoon of mayo or a teaspoon of butter. And way more satisfying that jelly or jam. *see not below.
Notice how quickly avocado turns brown after a few hours of slicing? No matter how much lime juice I squeeze on it, I usually end up having to toss it. But the remedy is to freeze it. I make ahead several avocados with a little lime juice and salt. Measure it out, flatten it, and freeze it between a small sheets of parchment paper, in one ounce portions. You can even freeze it in slices. If you don't have a food scale, you need one - it a must have for any bariatric kitchen!
A few minutes out of the freezer while I cook the eggs, or slice a pre-boiled egg from the fridge, and toast the bread—and it's ready for breakfast when I am. Fast, simple and delicious. Eat your heart out, Dr. Seuss!
Yes, you can. I just did. You have many more miles to go!
*Remember that a whole egg and 1 ounce of avocado (as well as a slice of bread) have around 9 to 10 fat grams,( around 5 is a good guideline) so you will want to adjust your portion size accordingly.
 Julia Holloman
 Post a Comment
spelt: naturally delicious
 Recently, I have begun to replace many of the wheat items in my diet with other kinds of flour, such as spelt, almond, rice and coconut.
Spelt is among one of the oldest cultivated grains in the ancient grain world. Like quinoa, millet, amaranth, or other grains, spelt has not been manipulated to meet manufacturing needs.
Spelt is one of the foods that our body recognizes as real food. Keeping many of its original characteristics it provides a broader spectrum of nutrients than wheat, and along with its easy digestibility, it even holds anti-inflammatory qualities.
Spelt is an excellent source of vitamin B2, manganese, niacin, thiamin, and copper. This particular combination of nutrients may make it a helpful food for persons with migraine headache, atherosclerosis, or diabetes.
For those who suffer from health issues such as digestive problems, arthritis, Lyme’s disease, migraines, behavioral issues, skin irritations, irritable bowel syndrome, and others report that they feel better eating spelt rather than common wheat. I know, I do.
Spelt flour has been a great replacement in my diet and I have found that it doesn't affect my blood sugar like wheat. I generally feel better and have more energy and less tummy issues when I eat spelt rather than wheat.
Spelt does have gluten, so it is not appropriate for people with celiac.
Spelt’s fragile gluten is easily broken apart during the chewing process which allows the enzymes and acid secreted during the digestive process to work on the surface of the food. During the digestive process, wheat forms a bolus which remains in a ball making it harder to digest.
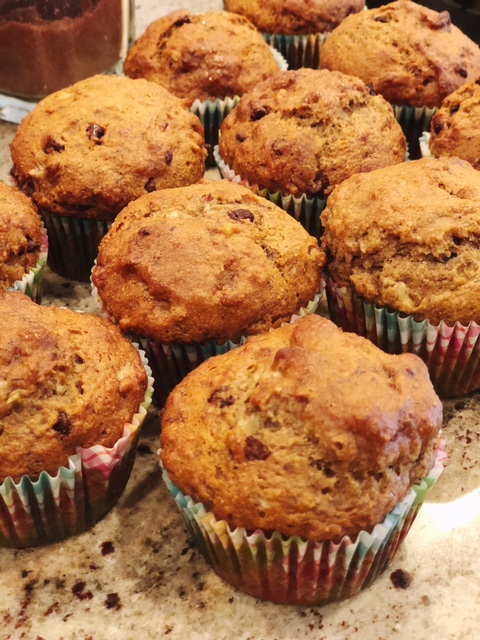
I'm always hesitant about trying new recipes using ingredients I'm not familiar with, but after tweaking this one a bit, these muffins were a winner. Definitely worth the effort. A perfect companion for an egg, they make a wonderful breakfast treat. Quick and easy to make, they are delicious and freeze well, too.
Spelt Flour: Julia's Chocolate Chip Banana Muffins
- 3 1/2 cups spelt flour (I have substituted 1 cup coconut, 1 cup almond, and 1/2 cup flax meal) for less dense muffins.
- 2 tsp baking soda
- 1 tsp baking powder
- 1 egg
- 3 cups mashed ripe bananas
- 2/3 cup Truvia Nectar (honey blend)
- 1/2 tsp Vanilla extract
- 1/4 cup canola or coconut oil
- 1 cup finely chopped pecans or walnuts
- 1/2 cup mini chocolate chips
Preheat oven to 375. Line muffin tin with paper liners.
In a large bowl mix together dry ingredients: flour, baking soda, and baking powder.
In another bowl, beat egg. Add bananas, honey, vanilla, oil, nuts and chocolate chips. Mix well.
Fold wet mixture into flour mixture and combine well.
Spoon batter into tins and bake for about 20 mins. Makes 24 muffins.
eggs and ham
 Great recipes finds! How much more simple can it be to get in your daily protein than with these yummy breakfast treats?
For recipes like this easy egg and ham muffins, packed with 16 grams of protein, and loads other protein-rich ideas go to: Daily Burn
I share this following site to give you ideas for foods with high protein possibilities. Although Daily Burn is a great site for exerise and dietary helps, it doesn't necessarily mean their recipes conform to our specific bariatric guidelines. Make sure that the recipes you choose are within your bariatric limits for fat, sugar and carb content—or adjust them to fit.
Remember that the guideline for safe eating—weight loss or maintenance after surgery (per serving) is approximately or no more than:
- 5 grams fat or less
- 10 grams sugar or less
- 15 -20 grams carbs or less
dark chocolate dipped apple slices
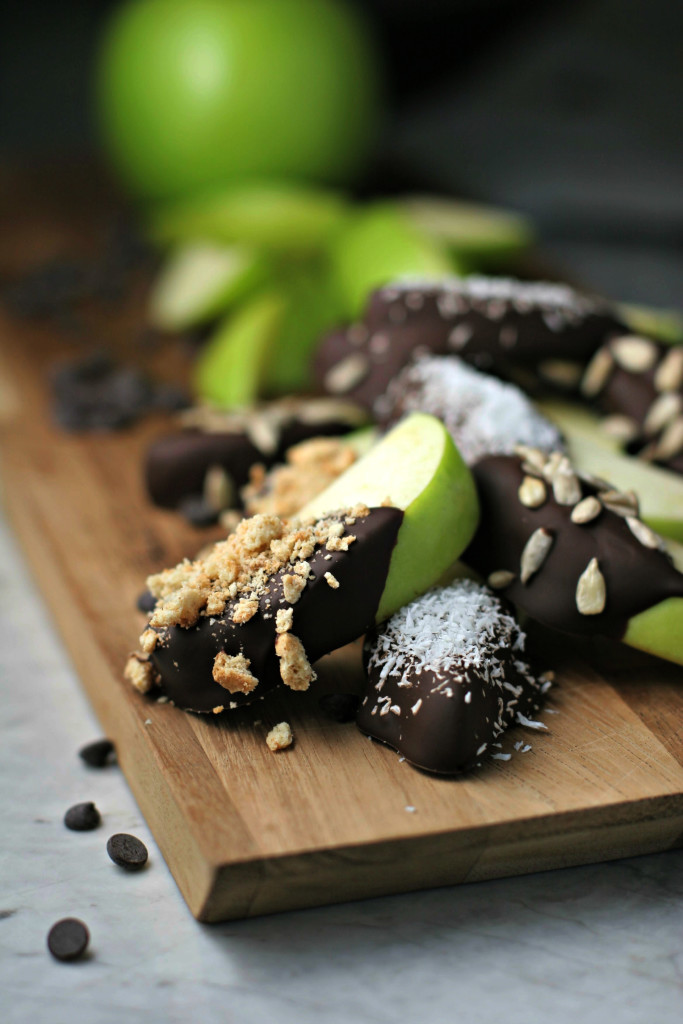 Dark Chocolate Dipped Apple Slices
- 3 green apples, thinly sliced
- 1 1/2 cups dark chocolate chips
- lemon or pineapple juice
- crushed graham crackers
- sunflower seeds
- shredded coconut
- raisins
- chopped nuts: such as pistachio, peanuts, pecans, or walnuts
- Line a baking sheet with parchment paper, set aside.
- Melt chocolate in a double boiler or microwave
- Brush or dip apples in lemon or apple juice to prevent browning
- Dip one end of apple slices in chocolate and place on parchment paper
- Add toppings of choice and let cool until chocolate has hardened
Recipe modified from original recipe: compliments of www.beginwithinnutrition.com
flourless banana pancakes
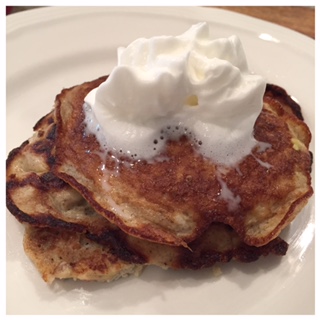 My dear friend, Hannah Meads, recently shared a recipe with me for these awesomely delicious banana pancakes. You won't believe the ingredients and how easy they are to whip up! When you taste them, you won't believe they are make with no flour. Just eggs and banana!
Banana Pancakes
- 2 eggs beaten or blended
- 1 banana mashed or blended
- cinnamon
Cook in a skillet like regular pancakes on low to medium heat. They even brown like really pancakes, but be careful they burn quickly if too much heat.
Garnish with a little syrup, peanut butter, whip cream or even a few mini chocolate chips!
The first time I made these I just used one egg and 1/2 a banana, but you could make the whole recipe and store them in the fridge for the next day, or an afternoon snack!
Enjoy. Yes, you can!